
Email notification - file level |

|

|

|
|
Email notification - file level |
|
|

|
Email notification - file level |
|
|
|
|
Email notification - file level |
|
|
|
|
|
||
Overview
Follow the steps below to enable email notifications of all ACH file transmissions to other personnel in your organization. If you wish to set up notifications for your customers, employees, or vendors, see Notifying Customers, Employees, and Vendors.
Note: You may need to configure your firewall to allow email to be sent through TreasurySoftware_email.exe. Contact your system administrator regarding this issue.
Setting up notification
From the main menu, select Transmit, then Transmit to Bank. The email settings for personnel notification through ACH Universal are contained in the Email, Email Advanced, and Notification tabs. The necessary information can be obtained through your mail client (for example, Outlook) or by contacting your system administrator. Information in the Email tab lists addresses to receive the created ACH file. Information in the Notification tab lists addresses who should receive notification of a transmission, but not a copy of the actual file.
Select the Email tab. You will see Figure 1 (below).
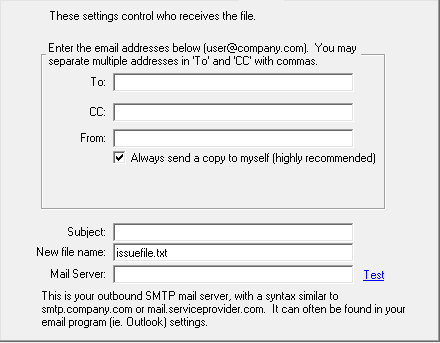
Figure 1 - Email tab
In the To: and CC: fields, enter the email addresses of your organization's personnel you wish to receive notifications. Enter your email address into the From: field. To send a notification to yourself, leave the checkbox enabled.
Enter a suitable subject to use for all notifications in the Subject field. The transmitted file will be given the name in the New file name textbox. Enter a filename you wish to use.
In Mail Server, enter your company's email server. For example, smtp.mailserver.com
Click the Email Advanced tab to display the the advanced mail server settings screen (Figure 2 below).
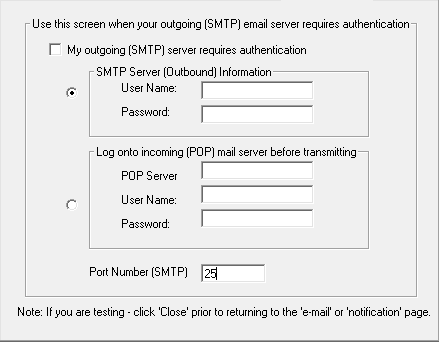
Figure 2 - Email Advanced tab
Enter the appropriate settings into the fields above.
When finished, return to the Email tab and click the Test link. This will generate a test email using the entered settings. If entered correctly, a test email will be sent to the email address listed in the To: field. If entered incorrectly, you will be alerted to a problem in the transmission. Please ensure all settings are correct as notifications will be not usable.
Click Close to complete notification setup. These settings will now be used to notify the listed personnel of all file transmissions.