
Notifying Customers, Employees, and Vendors |

|

|

|
|
Notifying Customers, Employees, and Vendors |
|
|

|
Notifying Customers, Employees, and Vendors |
|
|
|
|
Notifying Customers, Employees, and Vendors |
|
|
|
|
|
||
Your Data
Entering email addresses
To use this feature, the transactions that you want to send out emails for - must have email addresses.
You do not need to have everyone's email to get use this feature. For example, if you are collecting funds from your customers, but only a percentage have provided you with their email address - that's okay.
ACH Universal will send out emails for the transactions that you have an email address, and simply skip the others.
How to enter email addresses
If you are:
--importing transactions, map 'ACH_Email_Address' to identify the email address column.
--using ACH Universal profiles, make sure that an email address is entered in the profile
--integrating with QuickBooks, enter an email address in the QuickBooks Vendor, Employee or Customer profile.
Note: It is also possible to enter email addresses manually before transmission. See Editing Untransmitted Records for more information.
Note: You may need to configure your firewall to allow email to be sent through TreasurySoftware_email.exe. Contact your system administrator regarding this issue.
Setting up notification
From the main menu, select Email, then Setup Email.
The Email Setup screen will be displayed. Click Next.
To activate email notifications for the current account, click the checkbox at the bottom of the screen (Figure 1 below).
Figure 1 - Activate Email
Click Next.
You will now be on the Basic Settings screen (Figure 2 below).
Figure 2 - Basic Settings
With the exception of the To: field (which is automatically filled in by ACH Universal), all fields will be used for each email notification.
CC |
Comma-separated list of email addresses to copy each transaction to. This can be yourself or an address set up for this purpose. |
BCC |
Same as CC, except the notified party will be unaware of the copy. |
Subject |
Provide a subject for the email. It should indicate the purpose of the email. For example, "Transaction pending by TL Supply" |
From Email: |
List the email addresses to be used as the reply-to email. The recipient can reply to this address. This address will be used to catch bounced emails. |
From Name: |
The name to use for the email. Recommended is to use your organization name or subgroup instead of a person. |
Click Next.
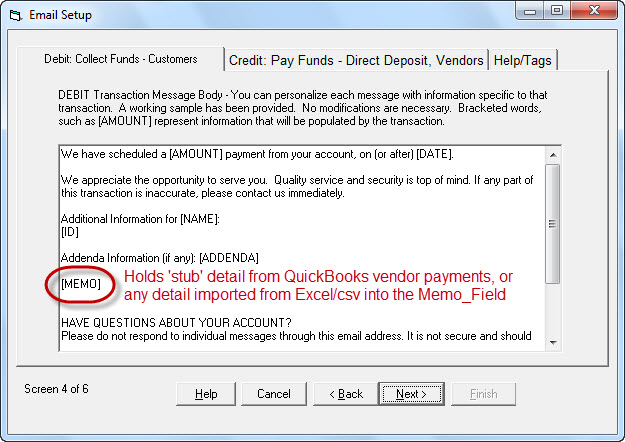
You will be be on the email template screen (Figure 3 below).
Note: There are different templates - one for debits and one for credits.
Information on this tab will be used for notification regarding all debit (or credit) transactions. A basic notification email is provided by default. You may customize the email as you see fit by editing directly in the window. Click the Credit tab to modify settings for credit notifications.
There are variables available for use in the emails to provide customer-specific information. This list is available in the Help/Tags tab as well as at List of Transaction Tags.
Note: The Memo tag holds the information for QuickBooks vendor 'stub' information.
When finished editing all tabs, click Next.
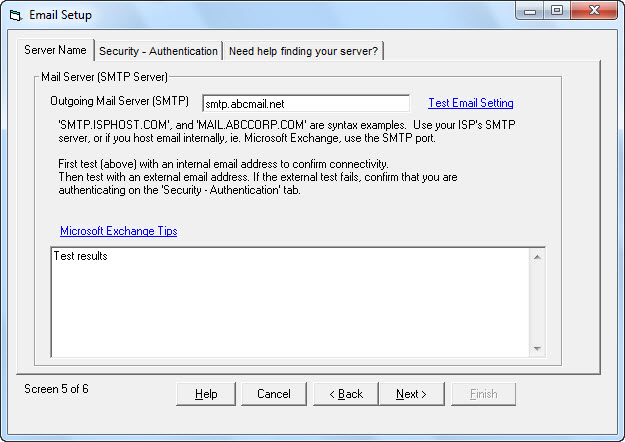
You will see Figure 4 (below). On this screen you will provide the settings needed to transmit emails using the email account you listed earlier. These settings can be obtained from your email client (for example, Outlook) or from your system administrator.
Enter the name of your SMTP server into the textbox. Click the Security - Authentication tab. You will see Figure 5 (below).
Exchange Server:
1. Configure these panels to connect to your SMTP port.
2. Initially test with an internal address (within your domain)
3. Tip: The Exchange console setting under the Server Transport - choose the internal connector.
4. Tip: Exchange's Network tab - add thenIP address of the computer that will be sending emails to the Exchange Server.
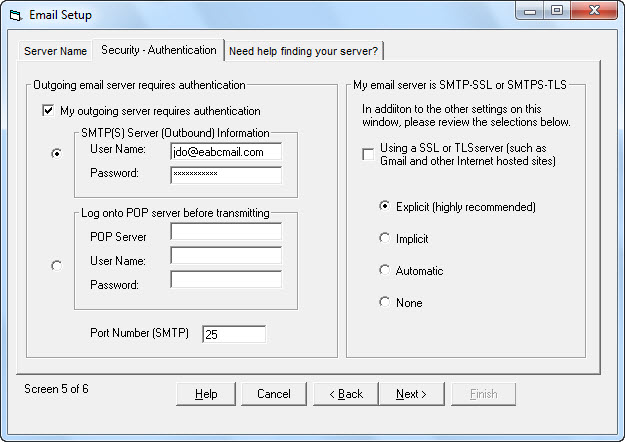
Security - Authentication panel
Enter your email credentials on the left side ('Outgoing email server requires authentication).
Tip: Are you only able to send emails internally (to your domain), but fails when sending outside your domain? If so, check your settings here. Make sure 'My outgoing server requires authentication' is checked, and your User name and password are correct.
If your SMTP server is configured with either SSL or TLS (gmail), then check the box and leave 'explicit' as your initial setting.
When all settings are entered, go back to the Server Name tab and click Test Email Setting. Enter your email address. If your settings are correct, you will receive a system-generated test message. If your settings are not correct, ACH Universal will display a message.
When everything is correct, click Next.
Preferences
You will be on the final screen.
The first two options are for our users integrating with QuickBooks:
1. QuickBooks stub information - Check this to populate the Memo field with the check stub information from within QuickBooks.
Important - Remember to have the '[MEMO]' tag placed in the body of the email in the Debit (or Credit) template. See screen number 4 above.
2. QuickBooks account information - Typically unchecked for QuickBooks users, this will display in the [MEMO] field your chart of account name for each line item detail.
3. To transmit emails automatically, enable the 'Automatically ... ' checkbox. These emails will be transmitted on a workstation level when you exit ACH Universal. If you do not check this box, you can trigger the email blast from the main menu at Email > Send emails.
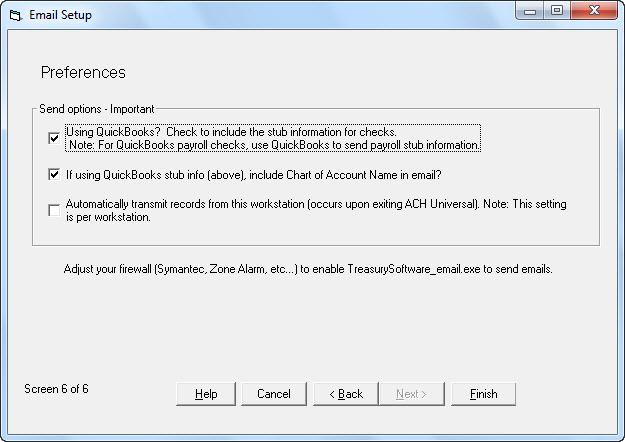
Click Finish to complete email setup.
Troubleshooting
Can't get an email out?
1. Check that your anti-virus software is not blocking you.
Norton Anti-virus and other packages may quarantine the file:
TreasurySoftware_email.exe
when it attempts to send out emails. Make sure that you add this file to your 'white' list.
2. Confirm that there are no firewalls, such as Microsoft Windows Firewall blocking you.
3. If using Exchange server, make sure that you ave proper permissions, and that your computer IP address has been added to the sender's list.