Prepare and backup your databases on the old server.
Move the databases from the old server to the new server.
Confirm user logins and permissions on the new server
Rollout - Point the user's workstations to the new server.
Note: If you have turned on segregation of duties, please turn it off by clicking on the Settings tab > Access Control. This feature is only available in the Processor Enterprise level license.
Install the Treasury Software on the new server using the instructions for a new SQL installation by clicking here.
Depending on your original version of Treasury Software, either:
or
Using Treasury Software built-in utilities.
At the old server run the Treasury Software as an admin.
Enter into any user account (not the sample).
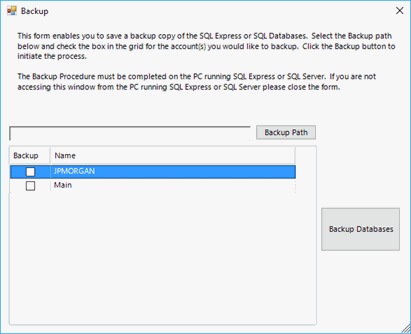
Check to see if your version has the built-in utilities by clicking on File > Backup.
If you are presented with a backup form - simply continue (otherwise jump down to using Microsoft SQL Server Management Studio section by clicking here).

Note: You must be running the backup from the same computer where the data is stored and running the software as an admin.
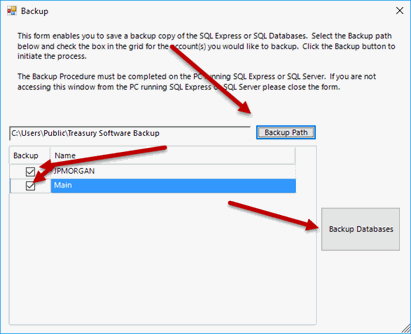
Enter a location for the backup file. Check the boxes for the accounts you want backed up. Click 'Backup'. Exit the software if prompted.
Note: Due to permission restrictions, we strongly recommend using the following path:
Note: Do not backup the sample account.
Copy the backup files (.bak) to the new server that is running SQL Server.
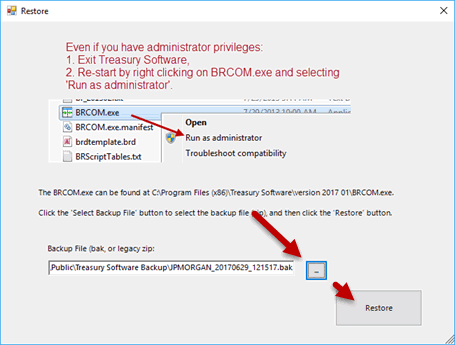
Start Treasury Software at the new location (At this point you should already be migrated to SQL) and enter into the sample account. From the main menu select 'File' > 'Restore' and point to the backup file.

Click Restore to complete the process. Repeat for each account. If prompted, allow Treasury Software to update the database. Lastly, you will need to select from the main menu 'File' > 'Open Account' and complete the wizard to import the account(s) into your list of accounts.
Note: Both the Backup and Restore process require that the client and SQL database be located on the same machine. If you do not have this setup, we recommend installing Treasury Software, even if temporary - to enable you to complete the process.
Confirm that you can access each new account before continuing with the 'Rollout' to the users.
Continue with 'Rollout to users' below by clicking here.
If your version of Treasury Software does not have the built-in utilities....
Note: The following instructions involves advanced knowledge of SQL server, and requires the support of your IT department.
Prepare and backup your databases on the old server.
Transmit any untransmitted ACH transactions in ACH Universal. Exit the software.
Backup the current SQL databases per your corporate policies.
Move the databases from the old server to the new server.
Detach the databases
Copy/move the databases to the new server. Yes, also copy/move the 'Sample' database.
Attach the databases on the new server.
For detailed assistance with the above three steps, see Moving SQL Databases for System Administrators.
Grant security permissions to the newly mounted databases. Make sure that you have proper login IDs and have granted permission to the BankRecPosPayUser group in each database.
Confirm the user's login on the SQL server with your database administrator (as below):
Enter into SQL Server Management Studio for the new server databases that you just attached.
Select Security (at the server level). Select 'Login'. Confirm the existence of the user's ID.
If there is no login, please create one now.
To add a login, right click on 'Login' and select 'New Login'.
.gif)
Enter the user's login name and complete the security options per your corporate environment.
For all users - you will need to grant permissions to the databases that you just attached.
--Select the User Mapping's page
--Check the databases they need access to. Note: Always grant access to the 'Sample' database.
--Make sure that the role 'BankRecPosPayUsers' is checked
.gif)
Click OK when finished.
At each user workstation - point the software to the new SQL server
--Enter into an account. From the Ribbon Bar select the Settings tab > Maintenance > SQL Tab > Connection sub-tab (default). On the right half of the panel - click the link 'Reset Connection from SQL to Desktop (brd)'.
Note: If you are using our legacy main menu - the Maintenance window can be accessed at File > Maintenance.
--Exit and then re-enter into software. Select an account.
--From the Ribbon Bar select the Settings tab >'Migrate to SQL Express, SQL Server' to start the wizard. During the wizard, you will be prompted to enter the new server and, if needed, your credentials.
Note: If you are using our legacy main menu - select File > Migrate To SQL.
--Exit and then re-enter into software.
--From the Ribbon Bar select 'File' > 'New Account' > 'Add an Existing Account'. Select the accounts that the user should be able to see on their list of accounts.
Note: It is possible that the user does not have browse permissions to see the list of accounts. If this is the case, you can simply type in the name of the accounts one at a time as below.
Tips:
The #1 issue in any upgrade is security.
--Make sure that you have a system administrator login ID before starting
--Create/arrange for logins for all users
--Confirm that the BankRecPosPayUser group has been granted rights to each database
and
--Confirm that each user has permission to the 'Sample' database. Do not delete or compress this database.
Congratulations!
Alternate approaches:
Export data to a pass thru file and then re-import it into the target database.
Note: Contact Treasury Software first for the appropriate tables to migrate - not all tables are copied.
Seehttp://www.treasurysoftware.com/support2-SQL-Import-Export.aspx
