Entering Transactions Manually |

|

|

|
|
Entering Transactions Manually |

|

|

|
|
|
||
Overview
While the bulk of records should be imported as files for maximum accuracy and efficiency, there can be situations where entering a record manually is a better choice.
For example, to create a one-time payment for a vendor, it may be easier to input the information directly than to enter it into a file and then import the file.
Manual Records screen
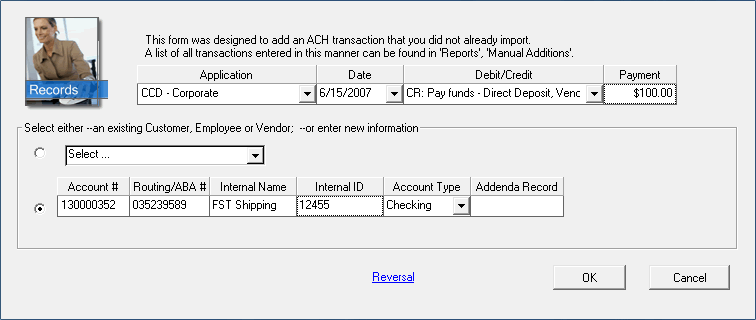
From the main menu, select Edit, than Add Record(s). The New Record screen will be displayed (Figure 1 below).

Figure 1 - New Record screen
Basic Information
All fields are required.
Application |
Select the Standard Entry Class Code you wish to use for this transaction. In this case, CCD is selected for a payment to another company. |
Date |
Select the date the requested processing date. Note: You cannot force a same-day transaction by using the current date. Contact your bank for their exactly time frame. |
Debit/Credit |
Select whether you are paying or receiving funds |
Payment |
Enter the amount as a positive number. |
Advanced Information
If you are using profiles (see Am I Using Profiles?), click the first radio button and select the profile from the dropdown box.
If you are not using profiles or are making a one-time payment and do not wish to create a profile, click the second radio button.
Enter the appropriate information. All fields are required with the exception of Addenda Record.
Account # |
Other party's bank account number |
Routing/ABA # |
Other party's bank ABA/Routing number |
Internal name |
Other party's name |
Internal ID |
An identifier for the other party, such as vendor ID |
Account Type |
Checking or Savings |
Addenda Record |
Optional addenda record. Maximum length of 80 characters. |
If you are entering a reversal, click the Reversal link. See Reversals for more information.
Click OK.