Once you have setup a 'Returns' account, you can enter transactions that you have received from other financial institutions.
Creating a return record
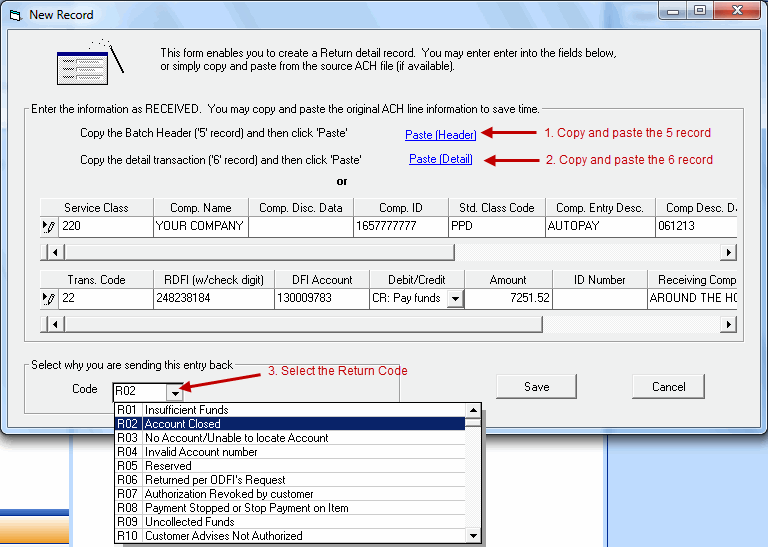
1. Access the 'Add Record(s)' Window Enter into the 'Returns' account within ACH Universal. From the ACH Universal main menu select 'Edit', 'Add Record(s)'.
2a. Recommended method - copy and paste from the original ACH instructions
Open the original ACH transaction in a text editor such as Notepad. Locate and copy the transaction. Note: Transaction records start with a '6'.
Click on the 'Paste Detail' (2nd link). This will automatically populate the necessary fields for your detail.
Then, return to the text editor and locate the batch header for this transaction. Copy the batch header. Return to the 'Add Record(s)' window and click on the 'Paste Header' (1st link). This will automatically populate the necessary fields for your header information.
Note: The order in which you copy and paste is academic (5 record vs. 6 record).
Below is a sample batch header (row starting with '5') and transaction line (row starting with '6'). We have included the first two lines as a ruler to help with the column positions (1 through 94). Of course, the ruler rows are not part of the ACH file.
1 2 3 4 5 6 7 8 9 1234567890123456789012345678901234567890123456789012345678901234567890123456789012345678901234
5220YOUR COMPANY 1657777777PPDAUTOPAY 060815060815 1202881060000001 622248238184130009783 0000725152 AROUND THE HORN 0202881060000001
2b. Manually enter the original ACH information - not recommended Alternatively, you may manually enter the information into the window. Please note that this method is not recommended, as the information must be EXACTLY as originally transmitted. Any typographic error may result in a rejection of your return.
3. Return Code On the bottom left of the 'Add Record(s)' window, select the Return Code (ie. Insufficient funds, etc...). Click 'Save' when finished.
When finished .... Create and transmit the records from this account. Please remember that these records will be in a separate file from your 'regular' ACH transactions, and the file will have a different name (see 'File', 'Options', 'Transmit to Bank', 'Local File' for the name and location of this file).
Notes: --Returns are created in the 'Add Record(s)' window and may be edited/modified before transmittal. --There is no import functionality through the import wizard for returns.
|
