Returns - Importing records
In addition to manually entering the return records, they can be imported through the Import Wizard.
How do I start - Where do I get my data from?
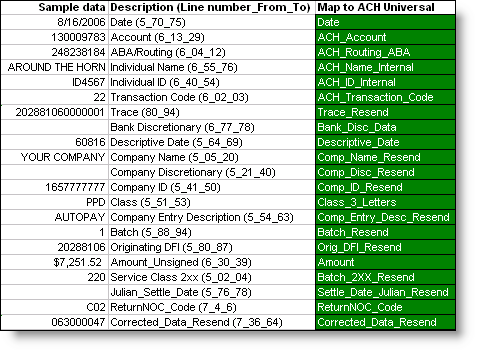
If you have an in-house IT group that is supplying you with data - it should contain the information in the chart at the end of this page.
The only way to get this data is to have access to the original ACH file. You can parse this yourself, or use our ACH-2-Excel conversion utility.
Example
1. Use our built-in ACH-2-Excel conversion utility (from the main menu 'File', 'ACH File Conversion') to create a comma delimited file.
2. Import the entire comma delimited file created with ACH-2-Excel into your core processing system or other database table.
The table should have an additional column for the Return Code. Include the 'R' and leading 0 if needed. Therefore, the return code 1 - Insufficient funds, would be in your database as R01.
Note: Adding the column should be performed programmatically in your database and not in Excel. If the file is opened in Excel, it will convert the trace numbers into exponential notation - making them unusable.
Once you have marked the records with the Return Code, export this to a comma delimited file.
Of course, not all records in the file you imported into your database are to be returned (at least we hope not). You will only want to export those with a return code.
As an example, we have used ACH-2-Excel to convert an ACH file into a csv file. Programmatically, we have edited the file and removed the last field and substituted it with the return code (R01, R02, etc...). This file can be imported directly into ACH Universal.
3. Enter into the 'Returns' account within ACH Universal. Start the import wizard and import your file.
Tips:
--If you used ACH-2-Excel to make your file - select the 'ACH NACHA RETURNS' mapping template. The columns will be in the correct order and position.
Note: When you select 'ACH NACHA RETURNS' for the first time, the system may warn you that the mapping template has more fields than the file you are importing. This is fine, as the additional field is used only in Notification of Changes.
--When selecting the template - mark it as the default, by checking the default checkbox. This is required if you are going to perform any type of automation.
Assuming you have retained our file layout from ACH-2-Excel and simply added one additional field (Return Code), this will map all the columns as shown below.
Notes:
--It is NOT necessary to map each column in order to generate a notification. Banks vary widely in their requirements of data - but of course, failure to include the information can result in their rejection. This is bank dependent. The more information provided to the originator, the easier it will be for them log your notice.
--The column in green, is the field to map to in ACH Universal.
--The middle column is a description, along with location of where the data was obtained from
First number - which record - header record '5', or the detail record '6'.
Second and third numbers - the start and end position within the record
--The last two entries, ReturnNOC_Code and Corrected_Data_Resend, are not from the original ACH transaction. The parenthesis in the last two lines refer to their location in the new file.

Note: The last line - Corrected_Data_Resend is not used in the Return file (only used in Notification of Changes).
