Changing File Transmission Method
Overview
After creating an ACH from your data, it must be transmitted to your bank to be processed.
Contact your bank to find out how they wish to receive your ACH files. Follow the instructions below to set up transmission methods based on their preference.
Loading Transmission Options
Select File from the main menu.
Select Options, then Transmit to Bank
Transmission Options screen will be displayed (Figure 1 below).
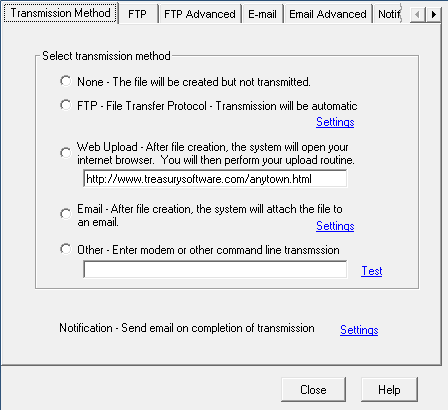
Figure 1 - Transmission Options
There are five possible methods of transmitting a file to your bank:
None |
File will be created but not transmitted. |
FTP |
Transmit via FTP built into ACH Universal. See Settings to modify the FTP settings. |
Web Upload |
Transmit via a bank web page portal. Type the portal address into the textbox for ACH Universal to load the page automatically in your default browser. |
Transmit via email sent by ACH Universal. Not recommended. |
|
Other |
Transmit using an optional method, including modem. Rarely used. |
FTP
FTP, File Transfer Protocol, is a method of transferring files. In most situations, you will upload your files to a specific directory on the FTP server that only you have access to. This secures your files from parties other than the bank from being able to access them.
To modify FTP settings, click the Settings link listed with FTP in Figure 1, or click the FTP tab. Figure 2 (below) will be displayed.
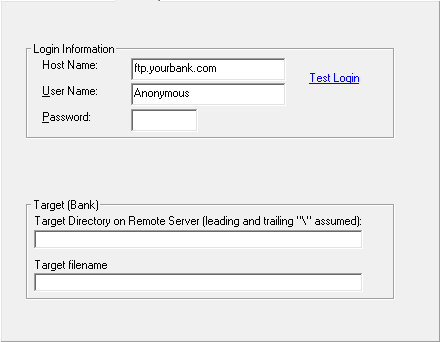
Figure 2 - FTP Options
All information on this page must be obtained from your bank.
The host name is usually in a format as shown above and resembles a website URL.
Username and password allow you access to a specific directory on the FTP server. Enter all the information and click Test Login to verify that login information and host name has been entered correctly and is functioning.
If your bank gave you a specific directory to upload your file into, enter it in the Target Directory textbox.
If your bank gave you a specific name to use for the file, enter it into the Target Filename textbox. This will not affect the name of your ACH file on your local hard drive. If your bank did you provide you with a name, enter a logical name for the file.
FTP Advanced Options
In addition to the general FTP options, there are some advanced options available that increase transmission security via Secure Sockets (SSL) and specific port numbers. This information must be provided to you by the bank. Do not change any of these options unless the bank specifically requests them.
Click Advanced to display the FTP Advanced Options (Figure 3 below).

Figure 3 - FTP Advanced Options
Secure Sockets Layer, or SSL, is a method of encrypting a transmission stream. To enable it at your bank's request, click the Bank Uses SSL Security checkbox. Select the type of SSL by clicking the appropriate radio button. Unless notified specifically by the bank, leave Automatic selected.
A Remote Port Number specifies a very specific port number. This offers the FTP server security from outside threats. Click Change Port and enter the port number provided by the bank, if any.
If the bank requests a bank transfer mode different than ASCII, click the appropriate radio button.
To set up email transmission, click Settings corresponding to Email or select the Email tab. Note: Email transmission is rare and not recommended as it is not secure.
Email Options (Figure 4 below) will be displayed.
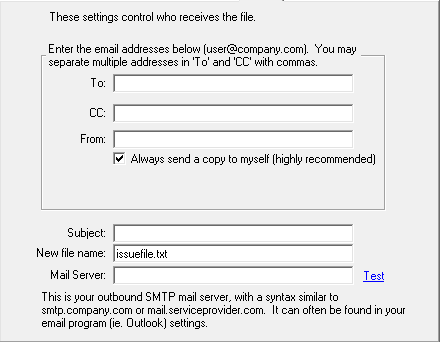
Figure 4 - Email Options
In the To: textbox, list the email addresses the file should be transmitted to. At least one of these should be the email address supplied by your bank for this purpose.
In the CC: textbox, list the email addresses you want to copy on the email. To send yourself a copy, list your email address or leave the Always send a copy to myself checkbox selected. For other people in your organization that need a copy, see Notification below.
In the From: textbox, list the email address to show as originating the email. This may be your personal email address or an address set up specifically for this purpose.
Enter a Subject to use for each transmission.
Enter the file name to be used for the transmission, regardless of the its name on your local hard drive. This does not rename your local copy.
Enter your mail server. For example, mail.server.com or smpt.server.com.
To configure appropriate settings for the mail server, select the Email Advanced tab.
Email Advanced
In this tab, you will configure the advanced settings of your mail server. After clicking the Email Advanced tab, you will see Figure 5 (below).
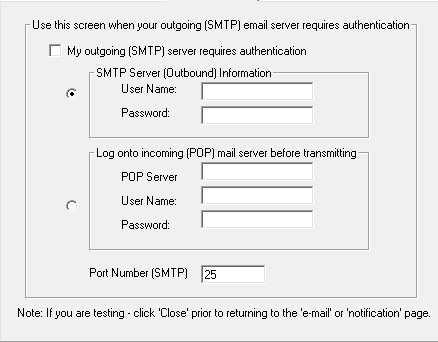
Figure 5 - Email Advanced Options
If you use a Windows program to download your email, such as Outlook of Thunderbird, you can retrieve most of these settings through Tools, then Options.
If your SMTP requires authentication for outgoing emails, click the checkbox.
For SMTP servers (most commonly used server type for sending email), enter the username and password.
For POP servers (rare for sending email), enter the server name, username, and password.
If your SMTP server uses a port other than port 25, enter it into the textbox.
Click Close.
Notification
Settings in the Notification tab are for setting up email addresses that should be notified of file transmissions. For example, if the process of creating and transmitting is automated, you may want an email sent to your personal address automatically notifying you that this has occurred.
Click the Notification tab to display it (Figure 6 below).
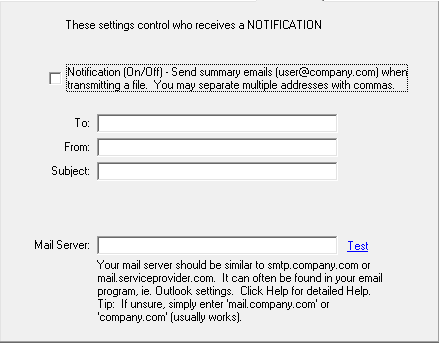
Figure 6 - Notification
To enable notification, click the checkbox.
Enter the email addresses that need to receive the notification in the To: textbox.
Enter the email address to use as the From address in the From: textbox.
Enter an appropriate subject.
